Subversion is an open-source version control system. That doesn't sound particularly interesting, and at face value it isn't, but you only need it to save your skin once to realise how useful it can be.
Version control is a method of storing different revisions of the same file, usually source code or documents. This allows developers to see when changes to a file have been made, which can be useful for isolating bugs, and can also be used to "roll-back" a file to a time before a bug was introduced.
Along with these features, version control allows developers to merge two versions of a file, which is very useful for projects with more than one person.
This article covers the following:
- What software you need
- Creating a new repository
- How to set up a Subversion server
- Adding password protection to a Subversion repository
- Laying out your repository and importing files
- Checking out and checking in
- Using tags and branches
What you'll need
Subversion – The primary download is source code, but there are binary versions available for different operating systems, including Windows, Mac OS and most common flavours of Linux.
If you intend to use Subversion mostly from the command line, you might want to add the Subversion binaries directory to your Windows PATH variable.
Optional Downloads
TortoiseSVN – If you're using Subversion with Windows, I highly recommend installing TortoiseSVN. It integrates with the Windows explorer shell, so you can see an icon if a file has been changed. You can and also check in items, commit changes and perform other common operations with a few clicks of the mouse instead of using the command line.
Creating a Repository
You can think of a repository as a database where all the information about versioned files is stored. You can either create your repositories in lots of different folders, or select one folder and create all repositories within it. The second option is better if you want the same server to handle multiple projects.
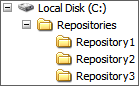
Repositories can be created using the command line, or by using TortoiseSVN. The examples below show how to create "Repository4" in our example layout.
Example Layout
Creating with the command line
svnadmin create c:\Repositories\Repository4
Creating with TortoiseSVN
- Use explorer to create a new folder in "C:\Repositories\" named "Repository4".
- Open this folder, and right click. Select "Create Repository Here" from the TortoiseSVN menu to create a repository.
Setting up a Subversion Server
Subversion is based on a client/server model, where the server takes care of storing versioned files and keeping logs of what has changed.
There are two ways to run a subversion server. The first is to install it as a module on an Apache 2 server. If you already run a local web-server, this might be the best option for you.
The second method is to use svnserve, which comes with the main Subversion
package. It's a simple command line tool, and is useful if you're only a single
developer or if you don't want Apache running. There are different ways to run
svnserve too, but we'll concentrate on using it as a "daemon" process. In other
words, once it's started it will run quietly in the background.
You'll need to specify the folder which contains your repository (or repositories), and specify a run mode. You can also supply an optional port number, instead of the default one (3690).
The following command will run a server that will serve our repositories, and will listen on port 85.
svnserve --daemon --listen-port 85 --root "c:\repositories\"
To check if it's working, open up a web browser and navigate to 127.0.0.1:85 (or 127.0.0.1:3690 if you didn't specify a port number). You should see something like the following in your browser:
( success ( 1 2 ( ANONYMOUS ) ( edit-pipeline svndiff1 absent-entries ) ) )
If you don't wish to set up a local server, you can use a professional subversion hosting service, such as wush.net or CVSDude. They take care of all of the server-side stuff, so you can concentrate on more fun jobs.
Adding password protection
If you're intending to allow other people to access your repository, you may want to add password protection to stop unwanted guests. Thankfully this is quite easy if using svnserve, and it only takes a few steps.
- Open up your repository folder, such as "Repository1". You should see several files and folders, including a folder called "conf"
- Open the "conf" folder, open the file "svnserve.conf" in a text editor.
- Find the line "# password-db = passwd" and remove the # at the beginning. Save and close.
- Open up the "passwd" file in a text editor. This file will contain an unencrypted list of usernames and passwords. To add a new user, add the line "user = password" after [users].
Laying out your repository
Now that we have a repository set up and a server listening for our requests, it's time to add some files. There isn't a rigid format for Subversion repositories, but the recommended structure involves creating three folders: trunk, branches and tags.
- Trunk – All of your files will go in this folder. It represents the main part of the project that is being worked on.
- Branches – This is used to store alternative versions of the project for experimental purposes. For example, you can create a branch of your project to test a new map rendering component. Checking in files will go to the branch and not the trunk, so your work won't affect the main project. If the experiment works, you can then merge the branch with the main project.
- Tags – Use tags for storing a copy of the source at a particular milestone. For example, you could create a tags for version 1.0, 1.1 etc. This is useful for keeping track of changes, as well as making backups in case a bug creeps in.
To set up your repository with these folders, perform the following:
- Create a new folder. For this example, we'll call it "c:\myproject".
- Inside this new folder, create three new folders. One called trunk, one called branches and one called tags.
- Optional step: Copy your project files into "trunk".
Once your folder scheme is set up, you're ready to import it into your repository. You can do this from the command line or using TortoiseSVN.
Command Line
svn import "c:\myproject" "svn://127.0.0.1/repository1"
If your repository is password protected, you'll need to add --password
PASSWORD and --username USERNAME
TortoiseSVN
- Navigate into "c:\myproject".
- Right click and select "import".
- Enter "svn://127.0.0.1/Repostory1/" as the repository name.
Multiple projects in a single repository
Because a repository is really just a folder, you can store as many projects as you like inside it. How you lay it out is up to you. You may either use top level folders for each project, and have trunk, branches and tags folders inside or a main trunk, branches and tags folder with individual project folders.
There is no set structure, and it doesn't really matter as long as all developers involved know how the structure works.
Checking out and checking in
"Checking out" is often referred to as "creating a working copy". When you check files out of the repository, you create a copy of the files on your own machine. You can edit them freely without changing anything on the main server. When you've made the changes you wish and everything is working, you can check the files in, or "commit" them.
To check out via the command line, use something similar to:
svn checkout svn://127.0.0.1/Repository1/trunk/
This will check out the latest files from the trunk of Repository1. If you're using TortoiseSVN, right click and select "SVN Checkout" and enter the URL you wish to checkout from.
Checking-in is just as simple. To commit changes using the command line, navigate to the folder your working copy is stored in and enter:
svn commit --message "Why I made these changes"
The message is optional, but it's extremely useful to make a note of what was changed, and more importantly why it was changed. Nothing is more annoying than changing between two methods because you forgot why it was such a bad idea.
If you're using TortoiseSVN, right click and select "SVN Commit".
Using Tags and Branches
Tags are useful for creating a record of the source at a set release, such as version 1.0 of your project. A branch is used to create an offshoot of the project, such as testing a new algorithm.
Creating a tag using the command line
- Open a command line window and navigate to your working copy folder
- Enter something like "
svn copy trunk tags/project-2.1.0" to create a tag called "project-2.1.0".
Creating a tag using TortoiseSVN
- Open your working copy folder
- Right click and select TortoiseSVN -> Branch/Tag
- Enter the URL of your new tag or branch. Typically this will be something
like "
svn://127.0.0.1/tags/project-2.1.0/" for a milestone.
Important Note: If you've created a branch, you'll need to create a working copy from it so that your changes will only affect the branch and not the trunk.
Further Reading
The Subversion book is available online at http://svnbook.red-bean.com/, and it contains just about everything you'll ever need to know. There are some very powerful features, such as setting up scripts to run before and after a commit (useful for parsing comments to see if it was a bug fix).
Hopefully this article has given you all you need to set-up and use Subversion in your daily development work. It may seem like a lot of effort at the start, but it's an incredibly useful skill to learn, and even if you only use it as an extra safety net, it's worth the time to set up.
2 Comments
After this:
( success ( 1 2 ( ANONYMOUS ) ( edit-pipeline svndiff1 absent-entries ) ) )
Then what?
That line just shows you that your server is working. If you want to manipulate the actual repository, you'll want to use a Subversion client. I recommend TortoiseSVN, because it makes the whole process much easier.
If you want web access to your repository, it might be best to install it as an Apache module and install something like WebSVN. I use SVNRepository.com for my Subversion hosting, as everything is set up and it's quite cheap. They also include Trac, which gives you web access and bug tracking.